Preparing a stand takes far more than choosing an attractive structure and adding your logo. This exhibition stand planning checklist walks you through every decision in the order it needs to be made: defining what the stand must do, design, layout, materials, lighting and graphics, production, venue approvals and build-up. It is written for companies exhibiting in Spain, including foreign exhibitors coming to Fira Barcelona or IFEMA Madrid for the first time, but the logic applies to any European trade fair.
A well-planned stand presents products clearly, gives your team a comfortable place to receive visitors and conveys a consistent corporate image. Every choice should belong to one overall project in which creativity and practicality support each other.
At Factoría Creativa we have spent over 20 years designing, building and installing custom stands from our 2,000 m² workshop in Barcelona. Here is how we recommend planning yours.
Exhibition stand planning checklist: the timeline at a glance
The short answer: book your space as early as the organiser allows, and brief your stand builder ideally 3–4 months before the show. Urgent projects can be done in less time, but a comfortable timeline protects your budget and your design options.
| When | What to do |
|---|---|
| As early as possible | Choose the fair, book the space, confirm stand type (inline, corner, peninsula, island) and hall location |
| 3–4 months before | Define objectives and budget, send the brief to your stand builder, receive concept and quote |
| About 3 months before | Approve the design; technical drawings prepared for submission to the organiser |
| 6–8 weeks before | Production in the workshop: structures, joinery, graphics, AV and furniture |
| 2–4 weeks before | Order venue services (electricity, water, internet, rigging), arrange shipping of samples, brief stand staff, request badges |
| Build-up days | Installation on site, final checks, handover to your team |
| After the show | Dismantling, storage of reusable elements, lead follow-up and review |
Exact deadlines for plan submission and service orders vary by fair and are set in each exhibitor manual, so check them as soon as you have your contract. One local tip: in Spain, August is a quiet month for many suppliers. If your show is in September or October, aim to approve the design before the summer break.
1. Define what the stand needs to do
The first step is to decide what the space must deliver. Companies show different products and need different facilities, so the design should start from an analysis of your specific needs.
An exhibitor showing machinery has to plan for the size and weight of the equipment and the access needed to bring it into the hall. A company presenting cosmetics, accessories or small products may need illuminated showcases, shelving and surfaces where samples can be examined up close.
Decide early which additional spaces you need. A meeting room, a storage room, a demonstration area or a reception counter should be part of the plan from the first sketches, so they fit naturally into the layout. You can see different layout and product display solutions in our stand projects.
Consider dimensions and location in the hall
The floor space you book sets the limits of the design, but it is not the only factor. The shape of the plot, its position in the hall and the number of open sides all affect layout and visibility.
- Inline (row) stand: usually one open side. Keep the entrance clear and arrange the interior so it can be read from the aisle.
- Corner stand: two open sides and more entry options.
- Peninsula stand: three open sides, with one back wall that can carry the main brand message.
- Island stand: open on all four sides. Display zones can be arranged around a central feature, with several entrances.
The aim is not to fill every square metre, but to use the space in a balanced way so it feels both attractive and practical.
Checklist: what to send your stand builder
- Fair name, dates and venue
- Stand number, dimensions and floor plan from the organiser, with open sides marked
- Objectives (leads, meetings, product launch, distributors, brand presence)
- Brand guidelines, logos and any campaign imagery
- Products to be displayed, with sizes and weights
- Required spaces: meeting room, storage, bar, demo area, counters
- AV needs: screens, video wall, sound, interactive content
- Budget range for the stand build (the space itself is paid separately to the organiser)
- Whether you want to reuse the stand at other shows
The clearer the brief, the more accurate the proposal and the quote. For an idea of budgets, see our guide to exhibition stand costs in Spain.
2. Choose a custom design that reflects your brand
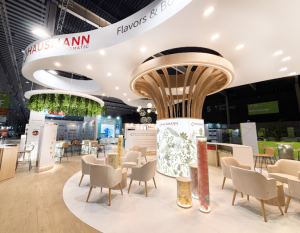
Design has more influence than anything else on the image your company projects at a fair. With hundreds of stands sharing the same halls, a visual proposal of your own makes your brand recognisable.
That means going beyond reproducing your corporate colours. Architecture, shapes, textures, lighting and furniture can combine to express the company’s personality and create an atmosphere that fits the product. A technology brand may opt for clean lines, continuous surfaces and screens built into the architecture. A food or cosmetics brand may choose warm materials, product-specific lighting and display areas that invite discovery. The point is not to follow a trend, but to find a solution that represents your brand and sets your space apart.
What a custom-built stand gives you
The main advantage of a custom stand is the freedom to adapt every element to one project. Layout, structures, counters, display units and finishes are designed for your dimensions and needs. You can include meeting rooms, showcases sized to your products, distinctive architectural features or integrated AV without being tied to a standard configuration. And all components share one visual line, so furniture, graphics and structures read as a unified proposal. If you are weighing up the options, read how a custom exhibition stand multiplies your impact.
3. Plan a layout that makes the most of the space
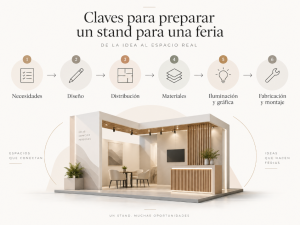
Once the concept is defined, the different zones have to be organised. The layout determines visitor comfort, product visibility and how the stand works during the show.
Reception should be easy to reach without blocking the entrance or hiding key displays. If you include counters, study their size and orientation so the team can serve visitors without creating unnecessary visual barriers. Products need space in proportion to their size: small samples suit showcases or dedicated display units, while bulky products need clear floor space and a position where they can be seen properly. If you plan demonstrations, reserve room for the equipment and its connections, and make sure people can gather without blocking circulation.
Fit in meeting rooms and storage without stealing the show
Meeting rooms provide a quieter setting inside the stand. Size them for the number of people you expect, so they do not take up a disproportionate share of the floor. The storage room is invisible to visitors but needs proper planning too: it must hold brochures, restocking and everything the team uses during the show. A discreet position and easy access keep the stand tidy without interfering with the display areas.
4. Select materials and finishes that support the design
Materials affect both the look of the stand and how it performs. Their selection belongs in the design process, not in a last-minute aesthetic decision. Not every material suits every use: a display unit carrying heavy samples needs a different construction from a surface used only for graphics.
Construction details have a direct effect on how the stand is perceived. Joins between surfaces, furniture edges, integrated doors and the meeting points between materials should all be resolved consistently. Think about maintenance during the show as well: counters and high-contact surfaces need tough, easy-to-clean finishes to look good on the last day as well as the first. Remember too that venues usually require fire-rated (flame-retardant) materials and may ask for certificates, so your stand builder should specify compliant materials from the outset.
5. Balance lighting, graphics and AV
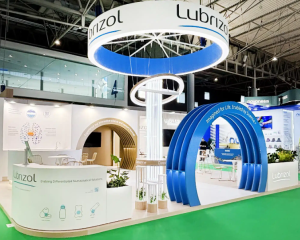
Lighting, graphics and audiovisual elements should be built in from the first design stages. Well-placed spotlights, backlit surfaces, graphics and screens highlight products and create different atmospheres within the stand. General lighting should support circulation and conversation; directional lighting can give prominence to showcases and specific samples. LED systems can be integrated into counters, shelving and decorative features, so they become part of the architecture.
Avoid visual overload
Graphics should identify the brand and present its products, but covering every surface with images and messages makes the stand hard to read. Set a clear hierarchy: the logo must be recognisable, the key products must stand out and supporting information should sit on suitable surfaces. If you use screens or video walls, study their position, height and viewing distance, and plan power and cabling so no installations are left on show.
6. Coordinate production, approvals and build-up
Once the design is approved, production begins. This is where the visual proposal becomes real components: structures, walls, counters, display units, electrical installations and graphic panels. To make sure the result matches the design, technical drawings must be developed and all production work coordinated. Dimensions, materials, electrical installations and fixing systems need to be defined before manufacturing starts.
Check the venue’s technical conditions at the same time. There may be height limits, specific requirements for certain structures (double-deck stands, rigging, enclosed ceilings) and deadlines for submitting documentation or requesting permits. As a reference, IFEMA MADRID’s participation regulations set out the general conditions for work and services on its site, and Fira Barcelona publishes equivalent technical regulations. Always check the specific rules of the fair where your stand will be built.
Logistics checklist for foreign exhibitors
- Ship samples, literature and giveaways to your stand builder or via the official freight forwarder, allowing extra time for customs if they come from outside the EU
- Order electricity, water, compressed air, internet and rigging points from the venue before the deadline
- Request exhibitor badges and confirm build-up and dismantling times
- Book hotels early: rooms near major fairs fill up fast
- Agree payment milestones and invoicing details (company name, VAT number) with your stand builder
Why design, production and build-up should be one project
When design, workshop production and on-site installation are handled by the same team, structures, furniture, graphics and installations are developed with a clear view of how they fit together. It also makes it easier to include bespoke solutions such as showcases cut to your products, counters with integrated lighting, meeting rooms or architectural features that reinforce the brand. Our stand build-up service in Barcelona and our work at IFEMA Madrid and venues across Europe follow this approach, with one point of contact in English throughout.
7. After the show: storage, reuse and follow-up
The project does not end when the hall closes. During dismantling, reusable elements are packed and can be stored in our workshop for your next fair, which reduces both cost and waste. Meanwhile your team should follow up leads within days, while conversations are still fresh, and review what worked: number and quality of contacts, meetings held, demonstrations given and content produced. That review is the best brief for your next stand.
Frequently asked questions about planning an exhibition stand
How far in advance should we start planning an exhibition stand?
Ideally 3–4 months before the show for the stand itself, and as early as possible for booking the space. A custom stand needs time for design, approval, materials, production and logistics. Urgent projects can be delivered with less notice, depending on size, complexity and the organiser’s deadlines.
What information does a stand builder need to prepare a proposal?
The dimensions and floor plan of the space, its location in the hall, your brand guidelines and details of the products you will show. Add specific needs such as meeting rooms, storage, showcases, counters or AV. The clearer the brief, the more accurate the design and the quote.
Why choose a custom stand instead of a standard solution?
A custom stand is built around your brand, products and dimensions, with bespoke furniture, distinctive architecture and a layout designed for your goals. The result responds to your real needs rather than a predefined configuration. Modular systems remain a good option for smaller budgets or frequent shows.
What affects the cost of a stand?
Floor area, design complexity, materials, bespoke elements and installations, plus screens or special structures, transport and on-site conditions. As a guide, a basic modular stand costs from €3,000–6,000, a mid-size custom stand €20,000–30,000, and premium stands for major international fairs can exceed €100,000. The space is paid separately to the organiser.
What are the benefits of one company handling design, production and build-up?
One team coordinates every phase, so design, materials, furniture and graphics are conceived as one space and there is a single person responsible for the result. For foreign exhibitors it also means one contract, one invoice and one contact who knows the venue.
Your next stand starts with a plan
Preparing a stand is a process in which every decision shapes the final result. Layout, architecture, materials and lighting have to be developed together to create a space that represents your brand and meets your real needs. If you are getting ready for your next fair in Spain or Europe, contact Factoría Creativa or call +34 933 17 17 71. Tell us the fair, the dates and the size of your space, and we will put together a proposal and a realistic timeline.